As we approach the end of the year, finance teams are faced with the inevitable task of handling 1099 tax forms. The process of printing these forms is not only time-consuming but also demands attention to detail. Fortunately, Sage Intacct provides a solution to simplify and streamline these intricate tasks, ultimately saving time for both you and your team. By leveraging Sage Intacct, you can enhance the efficiency of the entire 1099 reporting process and reduce the risk of errors. In this blog, we will guide you through the steps of printing your 1099s using Sage Intacct, offering valuable tips to ensure a smooth, compliant, and stress-free year-end.
Getting Started:
Tax Forms supported by Sage Intacct
- 1096
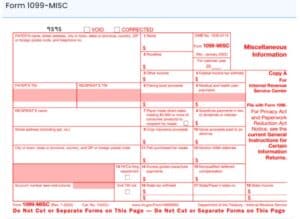
- 1099-MISC
- 1099-NEC
- 1099-DIV
- 1099-INT
- 1099-R
- 1099-S
- 1099-PATR
- 1099-G
- W2-G
1099 Forms can be purchased direct at https://intacct.dsa-direct.com/ or from the Intacct Home Page – Resources – Checks and Supplies

New Vendor Setup
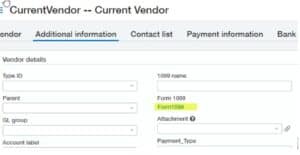
Go To: Accounts Payable > Setup > Vendors OR Purchasing > Setup > Vendors > Additional Information > tag as 1099 Eligible
If a current vendor is not tagged as 1099able, then only the 1099 link will appear, not the 1099 eligible checkbox.
If the ‘Print As’ and 1099 Name are the same, then the 1099 Name will be suppressed and the ‘Print As’ name will appear on the 1099. If you enter a 1099 Name and it is different than the ‘Print As’ field, both fields will print on the 1099 with the 1099 Name on top.

If you have a specific 1099 contact, you do not need to update the primary contact. Simply go into the contact list tab on the vendor record and change the 1099 contact.
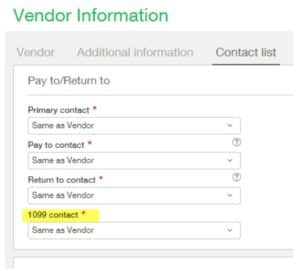
If there is a 1099 Contact, the Name will print on the 1099 in place of the “Print As” field on the Vendor record. If there is a 1099 Name on the Vendor record, it will print that first and then the Contact Name if they are different. If they are the same, only one name will print.
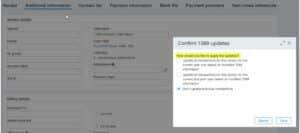
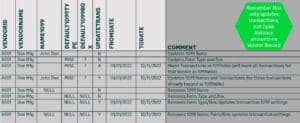
The below screen appears after you save the vendor info with the 1099 information to populate the type and box defaults for the vendor.
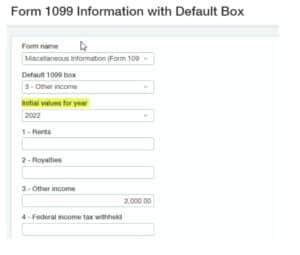
To enter YTD balances for this year:
- Select the default date found in the Initial Values for Year drop-down list.
- Enter the starting YTD balances in the blank fields.
Future amounts you pay the vendor through Sage Intacct are added to the amounts you enter here.
Tip: Remember to only enter the calendar year-to-date 1099 balance for each vendor. Also, neither AP Advances nor credit card transactions can be tagged as 1099able, so you may need to include these in your Initial Values for the year.
AP Adjustments – can be tagged as 1099-able
- If there is a cash payment against an adjustment, then the payment is included in 1099 form
Therefore:
- If an AP Debit Memo (DM) is fully applied against an AP Bill and both flagged as 1099 = true, since no cash payment, the 1099 form will not include the amount.
- If an AP DM is applied against a bill for partial amount and the remaining payment of the bill is cash, the cash portion will be included in the 1099 form but not the DM amount.
- If an AP Credit Memo (CM) were paid in cash against the CM, then the form will include the amount paid.
- 1099 reporting is on a cash basis. Only amounts paid are included on the 1099.
Multi-shared Companies
For multi-shared companies, issue a separate 1099 per entity checkbox in the Multi-Entity subscription/configuration.
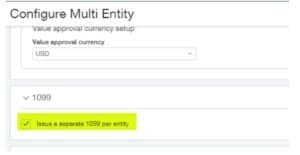
Issue a separate 1099 per entity checkbox is selected – initial YTD amounts are entered at the top level by selecting the entity, or at the entity level for each entity. In this mode, vendors in each entity are assigned entity-specific initial amounts.

If the “Issue a separate 1099 per entity” checkbox is NOT selected, initial amounts for all vendors and all entities are entered at the top-level.
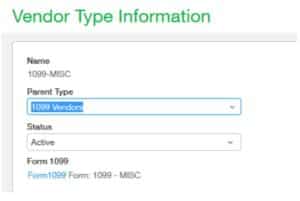
Setting 1099 Information by Vendor Type
A 1099 form and box can also be assigned to a vendor type. If the vendor type is defined as eligible for 1099, all vendors associated with that vendor type will be considered 1099 eligible. In this case, amounts are accumulated to the vendor type default 1099 form and box for each vendor.

Assigning Line Items on a Bill/Purchasing Transaction to a 1099 Form
If the AP setup enabled the update of the 1099 Flag and the 1099 Form/Box, you have the flexibility to assign different 1099 forms and boxes to individual line items when entering details for a bill.
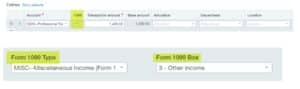
To change the override config, go to Accounts Payable/Purchasing > Setup > Configure > 1099 Section > check the boxes. When this box is checked, a single vendor can have multiple 1099 forms/boxes.
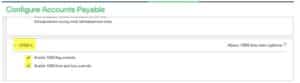
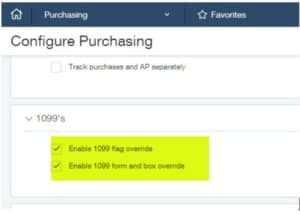
Note: Purchasing transactions won’t have the 1099 option at line level if the Transaction Definition is not configured to post to Accounts Payable.
Update Vendor Record
On the vendor record, changes to the 1099 Vendor Form or Box will provide the ability to update all associated transactions with the new default Form and Box.
**This process only updates transactions already tagged for 1099 treatment and does not update non-1099 transactions.
Uploads for 1099
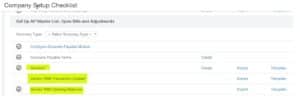
There are 3 uploads that impact 1099 processing for Vendors:
- Vendors – can be used to import new vendors and update existing vendors
- Vendor 1099 Transactions Update
- Vendor 1099 Opening Balances
Vendor 1099 Transactions Update
This upload does not create new records but updates existing ones.
The upload can retroactively mark existing transactions as 1099-able for specified vendors and a defined period. Additional fields allow for the update of the 1099 form type, box, and 1099 name. It is possible to modify any combination of these fields in a single upload; for instance, you could update the form type and box without altering the 1099 name and associated transactions.
The system ignores a blank in the NAME1099, DEFAULT1099TYPE, and DEFAULT1099BOX fields, and does not change the existing data. To delete the data, enter the value NULL. (case sensitive)
For more information about how to update 1099 transactions, watch the video here.
1099 Printing/File Creation
To Generate Report, go to Accounts Payable > All>Reports > 1099> 1099 Report
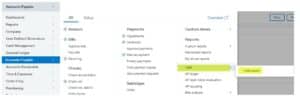
To Print Forms or Export file go to Accounts Payable>All> 1099s
Export 1099 file
- The 1099 Export File screen enables you to create a data file that you can send to a third-party service that specializes in printing and mailing 1099 forms. These services also file the required information with the Internal Revenue Service.
- You can export the file offline in either CSV or Excel file format, or you can export the data online in one of the following file formats: CSV, Excel, XML, or XSD.
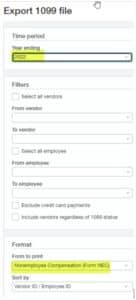
If you need to print corrected 1099’s, use the ‘corrected’ box, which will place an ‘X’ in the Corrected box on the 1099 form.
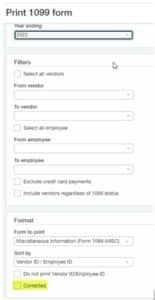
Print 1096/1099
Print 1099s for separate entities from the top level:
- To print separate 1099s for separate entities from the top level, your company needs to be configured to Issue a separate 1099 per entity. Forms print with the company name, address, and tax ID of the specific entity, even when printed at the top level. This means that if two entities make payments to the same vendor, the transactions from each entity will appear on separate 1099 forms.
- If your company is not using this configuration, you can only print one 1099 form for all entities from the top-level company. Forms print with the company name, address, and tax ID of the top-level company, even if a subordinate entity made the payment.
- If you have multiple entities with the same federal tax ID, you cannot print separate 1099 forms for each. Instead, create a location group containing these entities, and print a 1099 form for that group.
- If your company is configured to Issue a separate 1099 per entity, and the bill originated in Entity 2 but was paid by Entity 1, the payment to the vendor is included on the 1099 for Entity 2.
Print 1099s from the entity level:
- At the entity level, you can print 1099s on an entity-by-entity basis using the tax IDs and addresses of the individual entities no matter what your company configuration.
1099 Tips:
- Don’t forget to change the year before printing the forms
- If the vendor’s total 1099-MISC amount is less than $600 (2022 government guidelines), Sage Intacct will not generate a 1099 for that vendor
- 1099 amounts show in the year that the bill is paid. For example, if you pay a vendor in 2022 for a bill in 2021, the payment amount will be on the 2022 Form 1099
- Company address will be the Legal Address on the Company Info screen if ‘Issue a separate 1099 for each entity’ is NOT selected. (Company>Company Info)
- Company address will be the Legal Address on the Entity (Company>Entity) Info screen if ‘Issue a separate 1099 for each entity’ IS selected. Check the box to include Legal Address of the entity on 1099s and 1096
- If setup to ‘Issue a separate 1099 for each entity’ is selected in the ME configuration, and Entity 2’s bill is paid by Entity 1, the payment to the vendor will be included on Entity 2’s 1099
- If the vendor is owned by an entity, the 1099 report will need to be produced at the entity level
- You cannot tag charge card transactions created in Cash Management as 1099able and you cannot import charge card transactions as 1099able
- The ‘Exclude credit card payments’ option when printing 1099 forms is essentially irrelevant for the MISC form. Credit card payments are always excluded with the MISC form
- 1099s only generate for Active Vendors
Whether you have specific 1099-related questions or are interested in discovering how Sage Intacct can optimize your year-end close, CompuData can help navigate you throughout the process. Our team of certified Sage consultants have the expertise, resources, and methodology needed to guide you toward a more streamlined and efficient year-end experience.
For more information about 1099s or how you can leverage Sage Intacct for a seamless year–end close, email us.